Pour-over coffee is more than just a brewing method—it’s a ritual that offers clarity, control, and a truly immersive coffee experience. With the right technique, equipment, and patience, you can turn your kitchen into a mini café and produce a cup that rivals the best coffee shops. In this article, you’ll learn exactly how to master pour-over coffee at home.
What Is Pour-Over Coffee?
Pour-over is a manual brewing method where hot water is poured over ground coffee in a filter. Unlike automatic machines, pour-over allows precise control over every variable—grind size, water temperature, pouring speed, and coffee-to-water ratio.
This method extracts the most flavor from high-quality beans, resulting in a clean, balanced cup.
Why Choose Pour-Over?
Pour-over coffee has gained popularity for good reason:
- Clean Flavor: The paper filter removes most oils and sediments.
- Control: You can tailor each cup to your taste.
- Ritualistic Appeal: It’s a calming, hands-on process.
- No Need for Electricity: Great for travel or off-grid brewing.
What You’ll Need
To brew exceptional pour-over coffee, invest in a few essential tools:
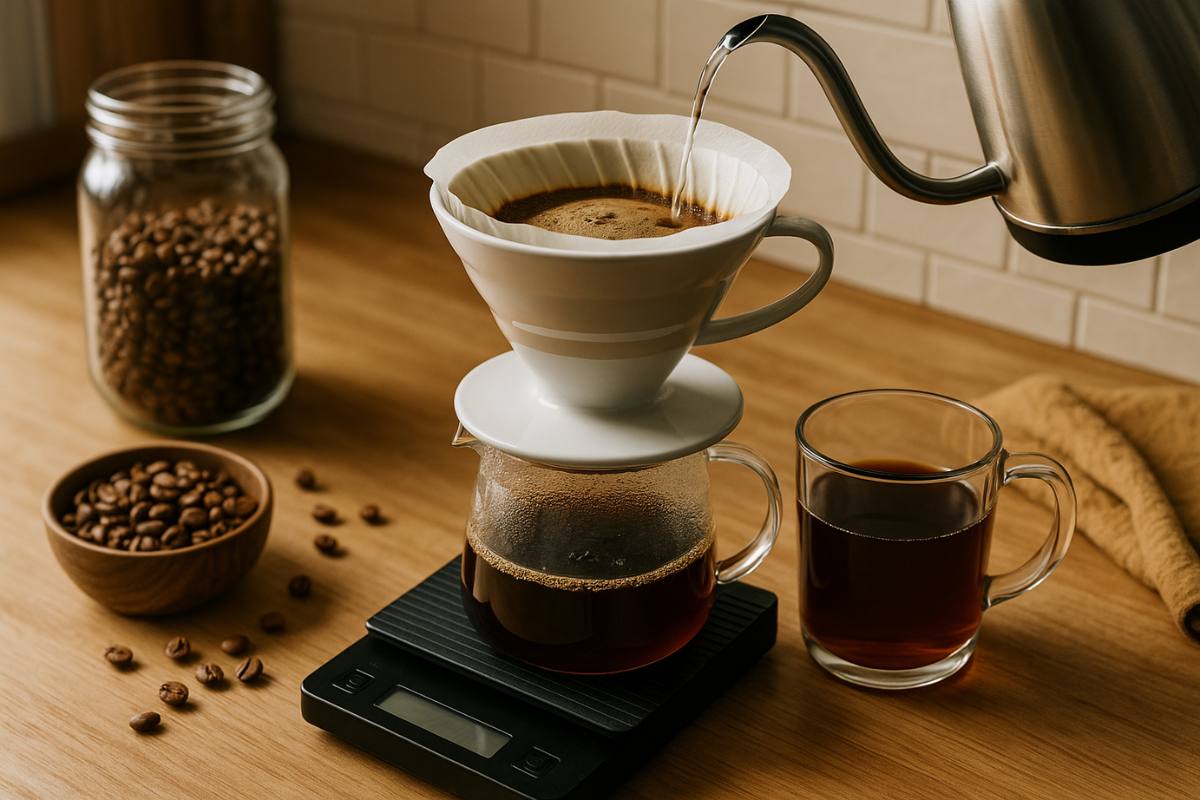
1. Pour-Over Brewer
Popular choices include:
- Hario V60: A cone-shaped dripper with spiral ridges.
- Chemex: A glass brewer known for elegance and thicker filters.
- Kalita Wave: A flat-bottom dripper that offers even extraction.
2. Paper Filters
Each brewer type requires specific filters—make sure they match your device.
3. Fresh Coffee Beans
Opt for single-origin, medium-roast Arabica beans. Freshly roasted beans (within 2–3 weeks of roast date) yield the best results.
4. Burr Grinder
For consistent grind size. Blade grinders are less precise.
5. Gooseneck Kettle
Allows precise pouring control, essential for even saturation.
6. Digital Scale
Ensures accurate coffee-to-water ratios.
7. Timer
Helps maintain consistency.
Coffee-to-Water Ratio
The golden ratio for pour-over is 1:15 to 1:17 (1 gram of coffee for every 15–17 grams of water). For one cup:
- Coffee: 20g
- Water: 300–340g
Adjust to taste: use more coffee for stronger brews.
Step-by-Step Guide to the Perfect Pour-Over
Follow these steps to create a rich and balanced cup.
Step 1: Heat the Water
- Ideal Temperature: 195–205°F (90–96°C)
- Boil your water and let it rest for 30 seconds.
Step 2: Grind the Coffee
- Use a medium-coarse grind, similar to sea salt.
- Grind just before brewing for maximum freshness.
Step 3: Prepare the Filter and Brewer
- Place the paper filter in your brewer.
- Rinse the filter with hot water to remove paper taste and preheat the vessel.
- Discard the rinse water.
Step 4: Add Ground Coffee
- Place your brewer on the scale and add 20g of ground coffee.
- Shake lightly to level the bed.
Step 5: Bloom the Grounds
- Start your timer.
- Pour just enough water (about 40g) to wet all the coffee grounds.
- Wait 30–45 seconds. This bloom releases gases for better extraction.
Step 6: Begin Pouring
- Continue pouring slowly in small, circular motions.
- Avoid pouring directly on the filter walls.
- Pour in stages (pulse pouring), allowing the water to draw down slightly between each pour.
Example Pour Schedule:
- Bloom: 40g (0:00–0:30)
- First Pour: Add up to 150g (0:30–1:00)
- Second Pour: Add up to 250g (1:00–1:30)
- Final Pour: Add up to 300–340g (1:30–2:00)
Step 7: Let It Draw Down
- Total brew time should be around 2:30 to 3:30 minutes.
- Adjust grind size and pour rate if draw-down is too fast or too slow.
Step 8: Serve and Enjoy
- Remove the filter and discard the grounds.
- Swirl your brewed coffee in the carafe or mug for even flavor distribution.
- Take a moment to savor the aroma before drinking.
Tips for a Better Brew
- Use filtered water: Chlorine and minerals can affect taste.
- Keep equipment clean: Old coffee oils create bitterness.
- Pre-wet the filter: Always rinse the filter to avoid paper flavors.
- Stay consistent: Use the same variables until you’re ready to experiment.
- Taste critically: Adjust grind, ratio, or pour pattern based on results.
Troubleshooting Common Pour-Over Issues
| Problem | Possible Cause | Solution |
|---|---|---|
| Sour taste | Under-extraction (too coarse, fast pour) | Use finer grind, slower pour |
| Bitter taste | Over-extraction (too fine, slow pour) | Use coarser grind, reduce brew time |
| Weak flavor | Too little coffee or too coarse grind | Adjust coffee ratio or grind finer |
| Coffee drains too fast | Grind too coarse or uneven saturation | Use finer grind, better pouring technique |
Pour-Over vs. Other Brewing Methods
| Method | Flavor Profile | Brew Time | Equipment Needed |
|---|---|---|---|
| Pour-Over | Clean, bright, nuanced | 3–4 mins | Moderate |
| French Press | Bold, heavy-bodied | 4–5 mins | Minimal |
| Espresso | Strong, concentrated | 30 secs | Expensive |
| AeroPress | Balanced, versatile | 2 mins | Moderate |
| Drip Machine | Consistent, convenient | 5–7 mins | Easy |
Advanced Techniques to Explore
Once you’re comfortable with the basics, try:
- Pre-infusion techniques
- Changing pouring spirals and speeds
- Using different water temperatures
- Using TDS meters and refractometers to measure extraction
These can help you refine and personalize your pour-over experience.
Final Thoughts: Coffee as Craft
Brewing pour-over coffee isn’t just about caffeine—it’s about craftsmanship. Each cup offers an opportunity to slow down, focus, and engage your senses. As you refine your technique and explore different beans, you’ll find that pour-over becomes not only a method of brewing but also a daily act of mindfulness.
With just a bit of practice, your home pour-over can rival even the most expensive café cup—and maybe even taste better, because you crafted it.